In today’s digital age, our smartphones have become more than just communication devices; they are our windows to a world of information and entertainment.
Whether you’re a tech-savvy enthusiast, a creative content creator, or someone who loves to share their experiences, the ability to record your iPhone’s screen can prove to be an incredibly valuable tool. From capturing gameplay sequences to demonstrating app functionalities, the screen recording feature empowers you to share your interactions with the digital realm.
In this guide, we’ll take you through a step-by-step process, ensuring you grasp the art of screen recording on your iPhone while discovering its myriad applications.
Steps for Screen Record On Any iPhone Device?
Step 1: Enable Screen Recording in Control Center
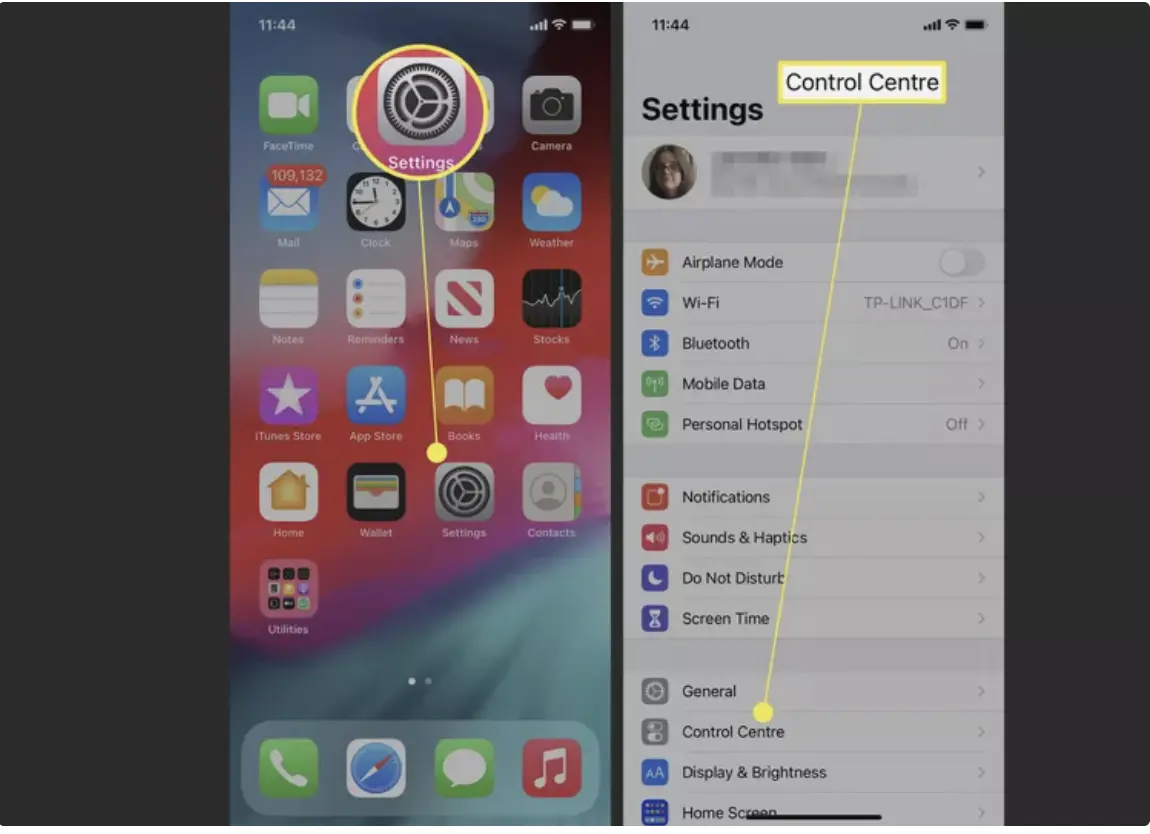
Before you start recording your iPhone screen, you need to make sure that the screen recording option is easily accessible. To do this:
- Open the “Settings” app on your iPhone Mobile.
- Scroll down and tap on “Control Center.”
- Under the “More Controls” section, find “Screen Recording” and tap the green plus (+) icon next to it. This will add the screen recording option to your Control Center.
Step 2: Access the Control Center
To initiate screen recording, you’ll need to access the Control Center:
- Swipe down from the upper-right corner of your iPhone screen (for iPhone models with Face ID).
- For iPhone models with Touch ID, swipe up from the bottom edge of the screen.
Step 3: Start Screen Recording
With the Control Center open, follow these steps to begin recording your screen:
- Locate the “Screen Recording” button, which looks like a circular icon with a white dot inside it. Tap on this icon.
Step 4: Customize Recording Settings
Before you start recording, you can customize certain settings to enhance your recording experience:
- Microphone Audio: If you want to include your voice or any external sounds, press and hold the “Screen Recording” button. This will open a menu that allows you to toggle on/off the microphone audio.
- External Microphone: If you have an external microphone connected to your iPhone, you can choose it as the audio source by tapping on “Microphone” and selecting the desired microphone.
- Screen Mirroring (Optional): You can also enable screen mirroring if you wish to record not just your device’s screen but also the content of another device you’re mirroring to your iPhone.
Step 5: Start Recording
Once you’ve configured your settings, press the “Start Recording” button. A three-second countdown will begin, after which your iPhone will start recording the screen.
Step 6: End and Save the Recording
To stop the recording, follow these steps:
- Open the Control Center again (using the same swipe-down or swipe-up gesture as before).
- Tap the red recording indicator at the top of the screen, or you can tap the “Screen Recording” button in the Control Center again.
- A confirmation pop-up will appear. Tap “Stop” to end the recording.
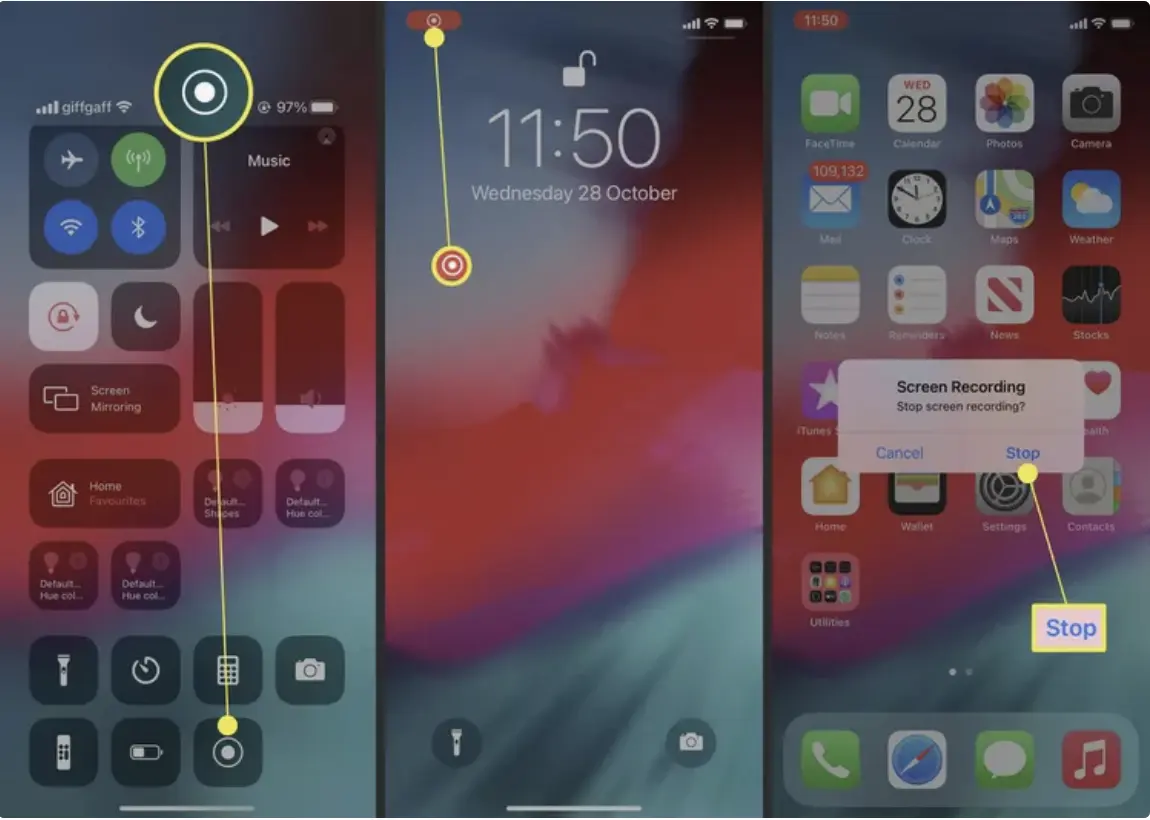
Your screen recording will be automatically saved to the Photos app on your iPhone.
FAQs
How do I access the screen recording feature on my iPhone?
Swipe down from the upper-right corner of your screen (Face ID models) or swipe up from the bottom edge (Touch ID models) to open the Control Center. Tap the circular icon with a white dot inside it labeled “Screen Recording.”
Can I record both the screen and my voice simultaneously on my iPhone?
Yes, you can. Before starting the recording, press and hold the “Screen Recording” button in the Control Center. This will allow you to toggle on the microphone audio, capturing both screen activity and your voice.
How can I record external sounds using an external microphone on iPhone?
If you have an external microphone connected to your iPhone, tap on the “Microphone” icon in the “Screen Recording” menu that appears after pressing and holding the “Screen Recording” button. Choose your desired external microphone as the audio source.
Can I record the content of another device I’m mirroring to my iPhone?
Yes, you can. Enable screen mirroring before starting the recording. In the “Screen Recording” settings, toggle on the “Mirror” option to capture both your iPhone’s screen and the mirrored content.
How do I stop and save a screen recording on my iPhone?
Open the Control Center again and tap the red recording indicator at the top of the screen or tap the “Screen Recording” button in the Control Center. Confirm by tapping “Stop.” Your recording will be automatically saved to the Photos app.
Are there any limitations to screen recording on iPhone?
Screen recording is not supported for certain apps on iPhones due to privacy and security concerns. Additionally, some streaming platforms may have restrictions on recording copyrighted content.
Can I edit or trim my recorded video directly on my iPhone?
Yes, after recording, you can open the recorded video in the Photos app and use the built-in editing tools to trim, crop, and make basic edits to the video.
Will screen recording affect my iPhone’s performance or storage?
Screen recording may slightly affect performance during recording due to the processing required. The recorded videos will be stored in the Photos app and will consume storage space, so it’s a good practice to periodically review and manage your recorded videos.
Is screen recording available on all iPhone models?
Yes, screen recording is a standard feature available on all iPhone models, including the iPhone 11, iPhone 12 mini, iPhone 14 Pro, and iPhone 14 Pro Max.
Can I share my iPhone’s screen-recorded videos with others?
Absolutely. Once the screen recording is saved in the Photos app, you can easily share it with others through messages, social media, email, or any other preferred sharing method.
Final Words
In a world where visual communication is paramount, the screen recording feature on the iPhone emerges as a versatile and invaluable tool.
Whether you’re a tech-savvy individual or a casual user, this simple yet powerful function empowers you to capture and share your device’s activities effortlessly.
With just a few taps and swipes, you can create engaging tutorials, showcase remarkable in-app moments, or preserve cherished memories for posterity.
The intuitive controls and customizable options make a screen recording a user-friendly experience, enhancing your ability to communicate and educate effectively.
So, as you explore the myriad possibilities that the iPhone offers, remember that the screen recording feature is your gateway to capturing life’s digital wonders with utmost ease and finesse.


![TablePlus Review [year]: Features, Pricing, Pros & Cons](https://myappleguide.b-cdn.net/wp-content/uploads/2025/07/TablePlus-Review-Features-Pricing-Pros-Cons-150x150.webp)